Peak
The highest-elevation point on Bermuda, Peak delivers a 360-degree tactical advantage over the entire map centre. Loot is consistently high-tier. Expect fierce competition on every match — this is the map's most contested drop zone.
The Original Battleground — Compact, Fast, Lethal
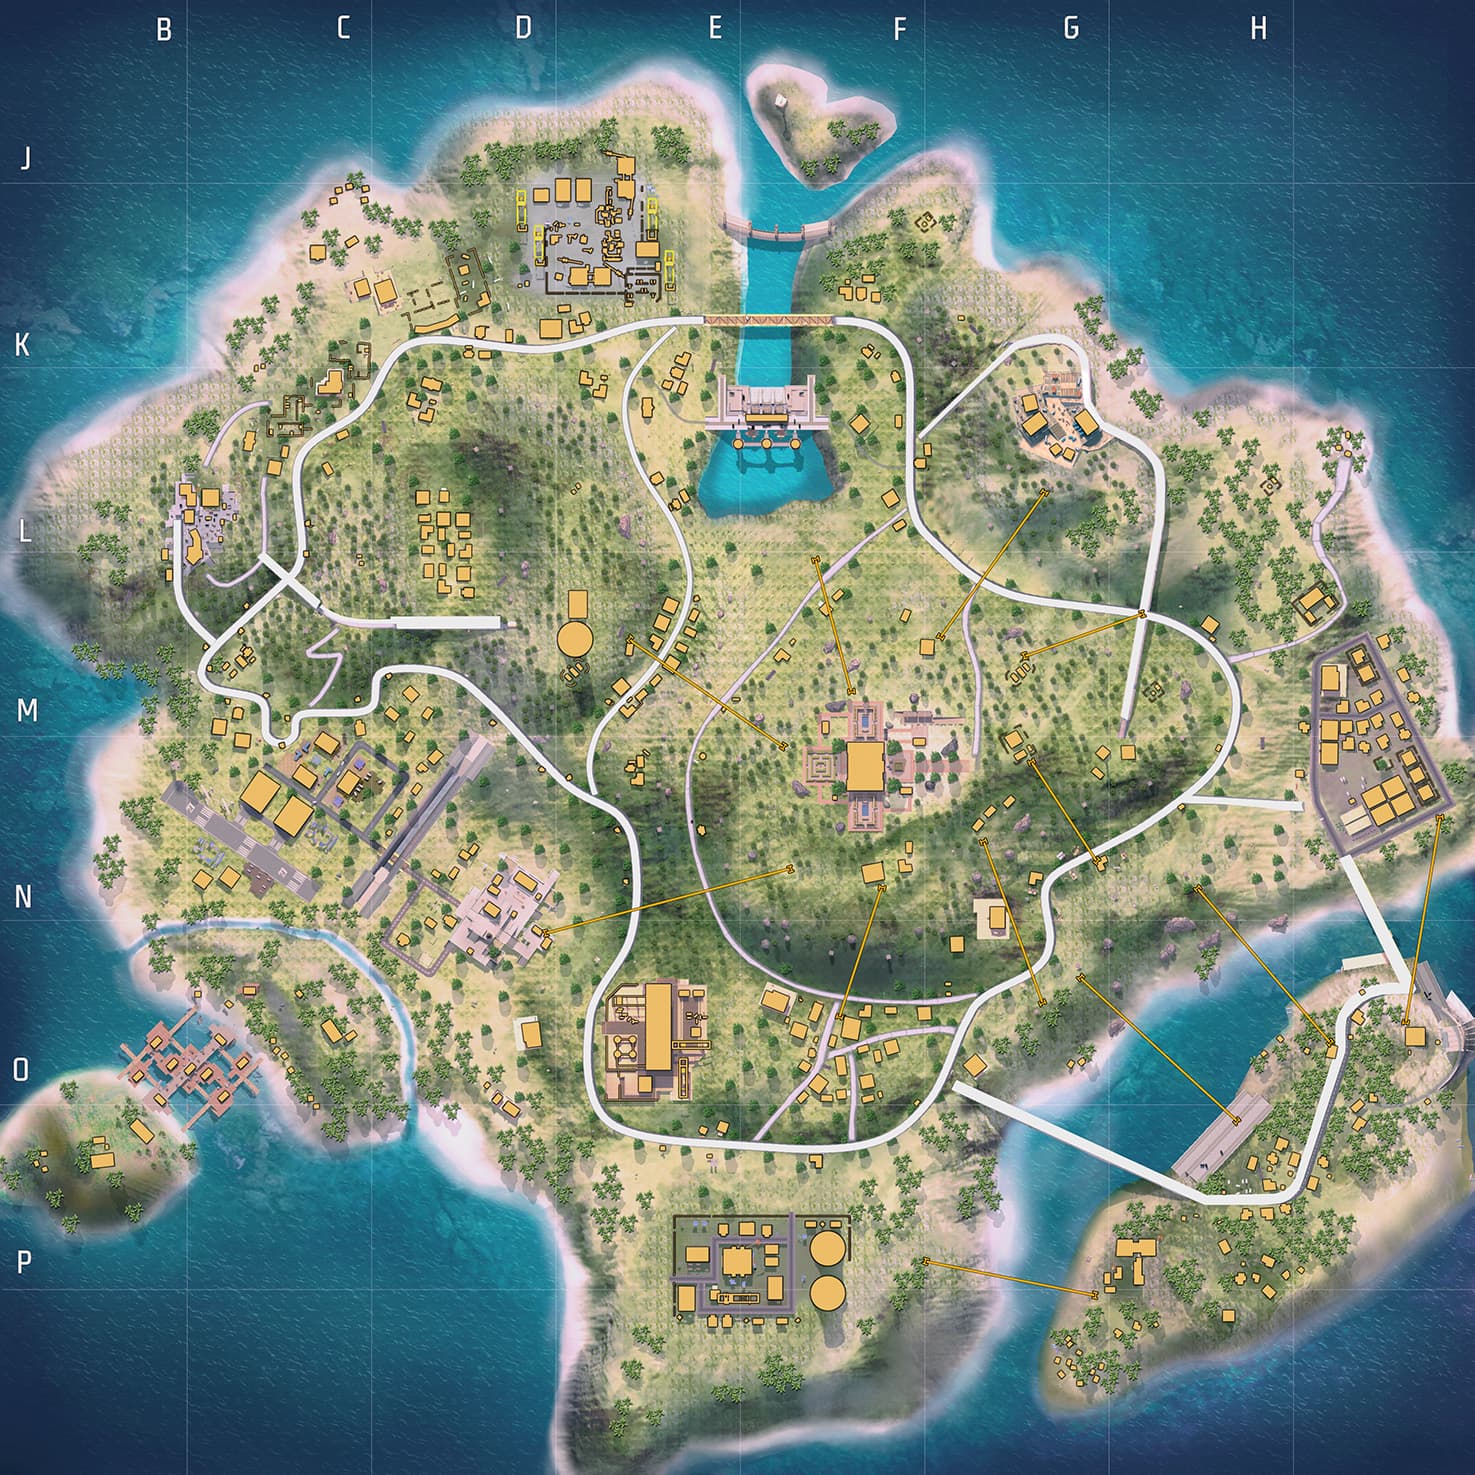
Bermuda is Free Fire's flagship map and the most iconic battleground in the game. Its compact 2×2 km layout forces squads into contact within the first minute of every match, making landing decisions and early rotations absolutely critical. The map's dense central hub — anchored by Peak, Pochinok, and Factory — drives aggressive, high-tempo gameplay, while edge locations like Rim Nam Village and Cape Town reward more patient, survival-focused strategies.

Bermuda is carefully constructed to balance drop-point selection with rapid safe-zone rotations. Controlling dynamic mechanics is crucial, and utilizing strategic heights allows squad structures to hold high-percentage control zones during closing phases.
Named after the mythical Bermuda Triangle, the island carries an air of mystery and danger. Its eclectic mix of industrial facilities, coastal towns, and rural outposts suggests a once-thriving trading hub now caught in the crossfire of a brutal survival contest. Landmarks like Katulistiwa (equator in Indonesian) and Rim Nam Village (riverside village in Thai) hint at a multicultural Southeast Asian influence woven into the island's character.
Analyze high-traffic zones, drop safety ratings, and ideal combat styles for each notable location.
The highest-elevation point on Bermuda, Peak delivers a 360-degree tactical advantage over the entire map centre. Loot is consistently high-tier. Expect fierce competition on every match — this is the map's most contested drop zone.
Dense multi-storey buildings in the heart of the map make Pochinok a guaranteed early-game brawl. Close-range weapon loadouts dominate here. Great for grinding frags but risky for squad survival.
A long commercial road lined with high-loot buildings and a tall observation tower. One of the richest loot zones on the map. The linear layout creates natural ambush corridors that reward positioning skills.
Vertical combat in multi-floor industrial buildings. High-tier loot scattered across floors and rooftops. A go-to drop for experienced players who thrive in chaotic, fast-paced fights.
Northeast drop with solid squad loot and a reliable vending machine. Moderate traffic makes it viable for both aggressive and patient playstyles. A strong opener for competitive rotations to Shipyard or Riverside.
Central-west farmland offering comfortable loot density without excessive early pressure. Ideal staging ground before rotating toward Bimasakti or Clock Tower in the mid-game.
Elevated structure with good sightlines in the map's southwest quadrant. Paired with Factory and Pochinok, Clock Tower is a pivotal mid-game rotation anchor for squads pushing toward final circles.
Eastern royal compound with structured buildings ideal for defensive setups. Less contested than central zones, yet loot quality is consistently strong. A preferred spot for teams that want to fight on their terms.
Old Town situated in the map's east, offering dense urban combat within colonial-style buildings. Moderate loot and predictable rotation lines make it a reliable mid-game staging point.
Quieter coastal settlement in the southeast corner. Good for AR loot and a calm early game. Recommended for beginners and rank-push players who prefer to avoid hot zones.
Riverside village tucked into the southwest edge. One of the least-contested zones on the map. Ideal for safe early gearing before rotating into the mid-game safe zone.
Southeast island-adjacent zone with calm loot conditions and predictable rotation paths to Cape Town and Mars Electric. Best suited for survival-first teams.
Isolated northwest science facility. Low traffic, decent loot. Excellent for advanced players who prioritise safe gear acquisition before pivoting to mid-game control.
Industrial air facility in the map's west. Large open hangars provide both cover and sniping opportunities. A flexible zone for squads who want quiet loot but remain close to the map centre.
Northern coastal shipyard with marine-themed structures. Solid loot spread across docks and warehouses. A reliable opener that allows fast rotation to both Mill and Bullseye.
Detailed gameplay walkthroughs tailored for competitive squad configurations and beginner adaptation.
On Bermuda, rotation is dictated by the first safe zone circle. Drop on the edge closest to that initial circle whenever possible. Use the map's narrow corridors at Bimasakti Strip and along the river for ambushes. Avoid crossing open ground — hug terrain features and buildings. Vehicles are rarely needed given the 2 km scale.
Land at Cape Town, Rim Nam Village, or Hangar. These quieter zones let you gear up without intense early pressure. Always loot a Gloo Wall early — it is essential for surviving open-ground rotations. Avoid Peak and Pochinok until you are comfortable with close-quarters combat.
Control Peak or Factory as your initial position, then rotate early toward the first safe zone with full loot. Third-party Pochinok fights for free kills. In final circles, Peak's high elevation gives the decisive sightline advantage — fight to hold it or rotate to deny the enemy that position.
Load Bermuda onto the interactive tactical planner to draw squad routes, custom drop markers, and rotation targets.
Bermuda's small size means the safe zone shrinks fast. Always check the first circle immediately after landing and plan your rotation before you finish looting — being caught outside early is the most common mistake on this map.
Use Peak, Observatory, and elevated terrain along the map's ridgeline to scan for enemies during rotations. Dropping into a valley blind is dangerous on a map this small.
Vending machines at Mill, Clock Tower, and other locations let you fill gear gaps fast. Controlling a vending machine during rotation is a significant mid-game advantage.
Pochinok and Factory fights produce weakened survivors. Position just outside these hot zones and move in when the dust settles for free kills and full loot.
Common tactical queries regarding map details, drop tactics, and strategic considerations.
Cape Town and Rim Nam Village are the safest options for new players. Both offer decent loot with low early-game competition, giving you time to gear up before rotating toward the safe zone.
Peak and Pochinok are the most contested drops on the map. Expect immediate combat with multiple squads. Only drop here if you are confident in close-range engagements.
Yes, vehicles spawn at several locations, but the 2 km map size means you rarely need them. They are most useful if you are caught on the wrong side of the safe zone in the late game.
ARs and SMGs dominate most engagements. A sniper rifle is valuable for Peak and Observatory positions. Shotguns excel inside Factory, Pochinok, and Keraton buildings.